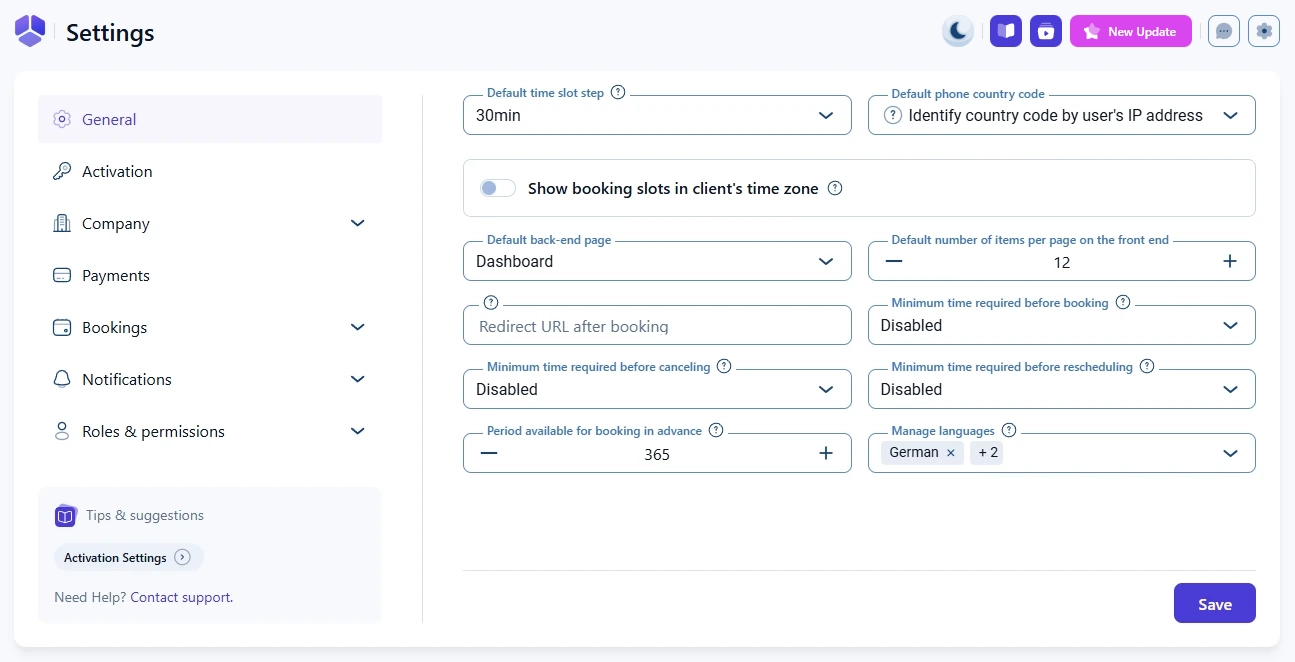
Video Version

Default Time Slot Step
This setting allows you to define the base time interval, or “grid,” that applies to all time-related configurations in Amelia, including Working Hours, Special Days, Service Duration, and Buffer Times. The Default Time Slot Step determines the increments in which time slots, durations, and other time-based options are set up and displayed. Available options range from 1 minute to 8 hours.
For example, if you select a 10-minute time slot step, your working hours and appointment options will be divided into 10-minute increments, meaning your customers could book at 9:00, 9:10, 9:20, and so forth. Likewise, your services will be configurable in 10-minute multiples (e.g., 10 min, 20 min, 30 min, etc.).
This setting ensures that all time configurations align with the specified increment. So, if you want a mix of services lasting 20 and 45 minutes, selecting a 5-minute time slot step would allow you to configure both durations (5 divides evenly into both 20 and 45). The selected time slot step ensures consistency and flexibility across your scheduling setup, adapting all time-based settings to this defined interval.
Use service duration for booking a time slot
Enable this option if you want the booking form’s available time slots to align exactly with the service duration. For example, if you offer a service between 5:30 pm and 9:30 pm with a 1-hour duration, and your Default Time Slot Step is set to 30 minutes, customers would see booking options at 5:30, 6:00, 6:30, etc. However, if someone books the 6:00 pm slot, the previous half-hour (5:30–6:00) and the following half-hour (06:30-7:00) become unavailable, causing a gap where booking isn’t possible.
By enabling the “Service Duration” option, the available slots will follow the full service duration. This means customers would see options only at 5:30, 6:30, 7:30, and 8:30, avoiding unusable time slots and ensuring smooth, continuous availability.
Default Appointment Status
This setting allows you to define the default status for all newly scheduled appointments. For instance, if you select "Pending" as the default, every new appointment will initially be set to "Pending" upon booking. This means each appointment will require manual approval and a status update in the plugin’s back-end before it’s confirmed.
Minimum time required before booking
This setting allows you to specify how far in advance customers must book an appointment. By default, this option is disabled, meaning customers can book appointments just minutes before the start time. If your business needs preparation time, you can select a minimum lead time from the available options, preventing bookings within that period.
For example, if you set this to 1 day, customers will need to schedule their appointments at least one day in advance.
Please note that this setting only applies to bookings made on the front end; it does not affect appointments created through the back end.
Minimum time required before canceling/rescheduling
This setting allows you to define how far in advance customers must cancel or reschedule an appointment. By default, this option is disabled, meaning customers can cancel or reschedule at any time before the appointment starts. If you’d like to restrict last-minute changes, select a minimum timeframe (e.g., 1 day). With a 1-day setting, for instance, customers would no longer be able to cancel or reschedule an appointment scheduled for the following day.
Period available for booking in advance
This option allows you to set how far into the future bookings can be made. For example, if you keep the default value of 365 days, your customers will be able to schedule an appointment for up to one year in advance. If you set it to 10 days, your customers won’t be able to book an appointment beyond that time.
Default phone country code
This setting lets you choose a default country code for phone numbers. Alternatively, you can select "Identify country code by user's IP address," which automatically detects the user's country code based on their IP address.
Set phone number as a mandatory field
This option lets you decide whether entering a phone number is mandatory or optional during the booking process. By default, this setting is disabled, meaning customers can proceed without providing a phone number.
Manage languages
This setting lets you add or remove languages for translating dynamic content across the plugin, including names, descriptions, and notifications. For more information about multilingual support in Amelia, check out the article here.
Set email as a mandatory field
This setting allows you to specify whether the email field on the booking form is mandatory. By default, this option is enabled, meaning customers must provide an email to complete their booking. If you disable it, customers will be able to proceed with the booking without entering an email address.
Show booking slots in a client time zone
This option enables the plugin to use multiple time zones. When enabled, your clients will see available time slots in their local time zone, while you will view the scheduled appointments in the time zone set in your WordPress General Settings. For example, if a client is in a time zone one hour behind yours and books an appointment for 8 PM, you will see it as 9 PM in the backend.
For a more detailed explanation, please check out this page or take a look at this video.
Show the "Add To Calendar" option to customers
This option allows you to remove the "Add to Calendar" feature from the front-end booking process. By default, this option is enabled, giving your customers the ability to add their scheduled appointment directly to their calendar. If you prefer not to offer this feature, you can disable it, and the option will no longer appear during the booking process.
Send ICS file in the notifications
This option allows you to include an .ics file in the notifications sent to your customers. This file enables them to easily add the scheduled appointment or event to their calendar.
This feature is especially important if you're using the WooCommerce integration. When WooCommerce is integrated, customers will be redirected to the WooCommerce cart and will not see the "Add to Calendar" option at the end of the booking process. By enabling this option, you ensure customers can still download the ICS file and add the event to their calendar.
Default items per page
This setting lets you define how many items will be displayed per page in the admin interface of the plugin. You can choose from 9 to 30 items per page, allowing you to customize the layout and make it easier to navigate and manage your data based on your preferences.
Default page on the back-end
This setting lets you specify the page that will be displayed first when you access the back-end of the plugin. By default, the Dashboard page is shown, but you can choose to set the Appointments, Calendar, or Events page as your default view, depending on your preferences and how you use the plugin.
Google Map API Key
This option allows you to enter your Google Map API Key, enabling the display of a Google static map on the “Locations” page.
Redirect URL After Booking
This option lets you define the URL to which customers will be redirected after booking an appointment. If left unconfigured, customers will be returned to the first step of the booking process upon clicking the “Finish” button.
Attachment upload path
With this setting, you can specify the location where attachments will be saved (if you're using the Attachment custom field). If left empty, all attachments will be uploaded to the default WordPress 'uploads' folder.
Enable Google reCAPTCHA
Enable this option to use Google reCAPTCHA and prevent bots from making appointments. When enabled, three additional options will appear, which will be explained below.
To use reCAPTCHA, sign up for an API key pair on Google’s reCAPTCHA website. The key pair includes a site key and a secret key, both of which you will need to copy and paste into the “Google reCAPTCHA Site Key” and “Google reCAPTCHA Secret Key” fields below. You’ll also have the option to enable the Invisible Google reCAPTCHA. This option displays a smaller reCAPTCHA, without a checkbox, at the bottom right of the booking form. It’s faster and takes up less space, making it ideal for forms with many custom fields while still ensuring bot protection.